
Fitting of Kitchen Chimney
- Kitchen chimney has many benefits for cleaning of odor and harmful flue gases in the kitchen as discussed in the post.
- Fitting a kitchen chimney (range hood) is a task that typically involves mounting the chimney,
- connecting it to the ducting or exhaust system (if applicable), and ensuring it’s securely in place.
- Here’s a step-by-step guide for fitting a kitchen chimney:
Tools and Materials for Fitting
- Kitchen Chimney
- Duct (if the chimney is ducted)
- Mounting Brackets or Wall Mounting Kit
- Measuring Tape
- Screwdriver
- Drill and Drill Bits
- Spirit Level
- Pencil
- Screws and Wall Plugs
- Flexible Hose (if the chimney is ductless)
- Electric Screwdriver or Wrench (for ductless chimneys)

How to Select Kitchen Chimney Location
- Selecting the right location for your kitchen chimney (range hood) is crucial for its effective operation and aesthetic integration into your kitchen as disccused in the post.
- Here are some steps to help you choose the optimal location for your kitchen chimney:
Over the Cooking Area:
- The most critical factor is to place the chimney directly above your cooking appliance (stove or cooktop).
- This ensures it can effectively capture and remove smoke, fumes, and cooking odors as they are generated.
Centered and Aligned:
- Position the chimney so that it is centered and aligned with the cooking area.
- .This not only maximizes the capture efficiency but also enhances the overall look of your kitchen.
Consider the Hood Size:
- Ensure that the chimney hood size is appropriate for your cooking area.
- The width of the chimney hood should be at least equal to or slightly larger than the width of your cooking appliance to cover the entire cooking area.
Height from the Cooktop:
- The ideal height of the chimney above the cooktop is typically between 24 to 30 inches (61 to 76 cm).
- However, you should refer to the manufacturer’s guidelines, as it can vary based on the specific model and design of the chimney.
Obstacles and Clearance:
-
- Ensure that there are no obstacles, cabinets, or shelving units directly above the cooking area that would obstruct the airflow into the chimney.
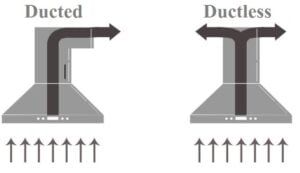
Ducting or Ductless Setup:
- Consider whether your kitchen chimney will be ducted or ductless.
- Ducted chimneys require a connection to an exhaust duct leading outside, which may influence the placement options.
- Ductless chimneys recirculate air within the kitchen after filtering it.
Consider Aesthetics:
- Think about the visual appeal of the chimney in your kitchen.
- Make sure it complements your kitchen’s decor and design.
Ventilation Needs:
-
- Take into account the specific ventilation needs of your cooking style. If you do a lot of frying or heavy cooking, you may need a more powerful chimney.
Ceiling Height:
-
- If your kitchen has a high ceiling, you may need an extension kit to ensure the chimney is at the appropriate height above the cooktop.
Professional Advice:
- If you’re uncertain about the location, it’s a good idea to consult with a professional installer or kitchen designer who can provide expert guidance.
- Keep in mind that the ideal location for your kitchen chimney can vary depending on the layout of your kitchen and the specific features of your cooking area.
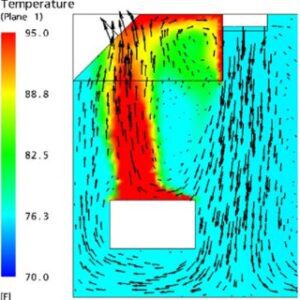
- Selecting the right location in such a way that the chimney functions should remove cooking byproducts and maintain good indoor air quality. You can determine based on CFD simulations of the chimney.
Installation Steps:
Select the suitable Location:
- Choose a location for your chimney above your stove or cooktop.
- Make sure it is centered and aligned with the cooking area.
Measure and Mark:
- Measure the exact spot where you will mount the chimney.
- Use a spirit level to ensure it is level and properly aligned.
- Mark the positions for mounting brackets.
Install Mounting Brackets:
- Secure the mounting brackets to the wall or ceiling at the marked positions using a drill and appropriate screws and wall plugs.
Ducting (if applicable):
- If your chimney is ducted, install the ductwork.
- Ensure it’s connected to the chimney’s exhaust outlet and leads outside your home.
- Use appropriate connectors and clamps.

Mount the Chimney:
- Lift the chimney and attach it to the mounting brackets. Secure it in place following the manufacturer’s instructions.
- Typically, you’ll use screws provided by the manufacturer to attach the chimney to the brackets.
Electrical Connections:
- Connect the electrical wires to the chimney according to the provided instructions.
- If you’re not experienced with electrical work, hire a professional electrician to do this.
Ductless Chimney Adjustments (if applicable):
- If your chimney is ductless, you’ll need to attach the flexible hose to the exhaust outlet on the chimney and connect it to a recirculating kit or carbon filter.
- Follow the manufacturer’s guidelines for your specific model.
Final Adjustments:
- Check that the chimney is level and securely attached.
- Make any necessary adjustments to ensure it’s properly fitted.
Testing:
- Turn on the chimney and verify that it’s functioning correctly. Ensure the airflow is moving in the desired direction (outward for ducted chimneys).
Regular Maintenance:
- Remove and clean the filters regularly as per the manufacturer’s recommendations to maintain the chimney’s efficiency.
Steps to Service Your Kitchen Chimney
Devices for Kitchen Chimney Cleaning
You need the following 6 things for cleaning your chimney at home
- Screwdriver
- Cleaning brushes
- Warm soapy water or a suitable cleaning solution
- Disposable gloves
- Replacement filters (if needed)
- Ladder (if the chimney is ceiling-mounted)
Safety Precautions:
- Ensure the chimney is switched off and unplugged before you begin servicing to prevent electrical accidents.
- Wear disposable gloves to protect your hands.
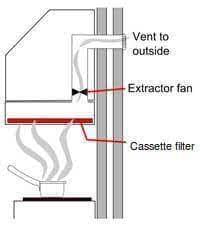
Remove Grease Filters:
- Grease filters are usually located in the canopy or below the hood.
- Carefully remove them from their housing.
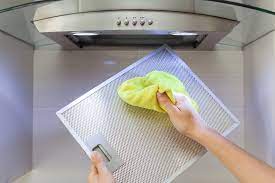
Clean Grease Filters:
- Wash the grease filters in warm soapy water or a suitable cleaning solution.
- If they are dishwasher-safe, you can also use a dishwasher. Make sure they are completely dry before re-installing.
Inspect Carbon Filters (if applicable):
- If your chimney has carbon filters, check their condition.
- Carbon filters cannot be cleaned and must be replaced when they are no longer effective.
Clean the Interior and Exterior:
- Wipe down the interior and exterior of the chimney hood with a damp cloth.
- Pay special attention to areas that may have accumulated grease or grime.
- Use a mild cleaning solution for stubborn stains.
Clean the Fan or Blower (if accessible):
- If your chimney has an accessible fan or blower unit, clean it by gently removing dust and debris. Be careful not to damage any components.
Check Ducts and Pipes (if ducted):
- If your chimney is ducted, inspect the ducts and pipes for any blockages or buildup of grease. Clean or replace any clogged ducting to ensure proper ventilation.
Reassemble:
- Reassemble the grease filters and any other components you removed during cleaning.
Switch On and Test:
-
- Switch on the chimney and ensure that it operates smoothly. Check for proper suction and ventilation.
- Replace Filters (if needed):
- If your carbon filters are worn out or your grease filters are damaged, replace them with new ones.
- External Cleaning (Optional):
- Clean the external parts of the chimney hood, such as the canopy and the chimney body, if necessary.
- Schedule Professional Maintenance:
- While regular cleaning and filter replacement can be done by homeowners, it’s a good idea to schedule professional maintenance at least once a year to ensure the chimney’s motor, electrical components and other critical parts are in good condition.
Summary
- installation instructions may vary depending on the brand and model of the kitchen chimney you’re using, so it’s important to follow the manufacturer’s guidelines provided in the installation manual.
- If you’re not confident about the installation process, or if it involves complex ducting or electrical work, it’s advisable to hire a professional installer to ensure the chimney is correctly and safely fitted.
- Professional installation can also help maintain any warranties provided by the manufacturer.
- Remember to follow the manufacturer’s instructions provided in the user manual for your specific kitchen chimney.
- Proper maintenance not only ensures better air quality in your kitchen but also extends the life of your chimney and helps it work efficiently.