Problems and Replacement of Old Parts in Fridge
- Replacing parts in an old fridge can extend its life and improve efficiency.
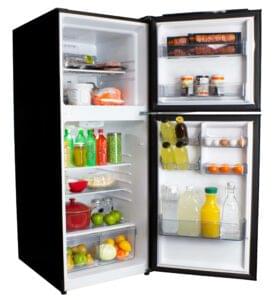
- Understand major parts of Parts of Home Refrigerator
-
Note major issues like Cooling Issues in Refrigerator and find the Solutions
- Here are some common parts that may need replacement in an old refrigerator, along with guidelines on how to replace them:
Fridge Door Seals or Gaskets
- Problem: Worn or damaged seals let cold air escape, making the fridge work harder.
- Replacement:
- Purchase a replacement seal that matches your fridge model.
- Remove the old gasket by pulling it away from the door.
- Clean the door surface.
- Attach the new gasket by pressing it into place along the door’s edge.
- Tip: Soak the gasket in warm water to make it more flexible during installation.

Thermostat
- Problem: If your fridge isn’t cooling properly, the thermostat might be malfunctioning.
- Replacement:
- Unplug the fridge.
- Locate the thermostat (usually inside, near the back panel).
- Remove the housing and disconnect the thermostat’s wires.
- Replace with a new thermostat and reconnect the wires.
- Secure the housing and plug the fridge back in.
- Tip: Test the fridge after replacing the thermostat to ensure it’s maintaining the correct temperature.

Condenser Fan Motor
- Problem: If your fridge is noisy or not cooling, the condenser fan may have failed.
- Replacement:
- Unplug the fridge and locate the condenser fan (usually behind or at the bottom of the fridge).
- Unscrew the fan cover and disconnect the motor wires.
- Install the new fan motor, connect the wires, and secure it with screws.
- Replace the fan cover and plug the fridge back in.
- Tip: Clean the surrounding area before replacing to ensure better airflow.
Water Filter
- Problem: A clogged water filter can reduce water flow to the dispenser and ice maker.
- Replacement:
- Find the water filter compartment (inside the fridge or in the grill at the bottom).
- Turn or push to remove the old filter.
- Insert the new filter according to the manufacturer’s instructions.
- Tip: Always run water through the dispenser for a few minutes after replacing the filter to remove air and impurities.

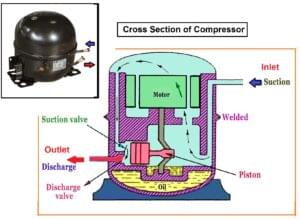
Compressor
- Problem: If the fridge is not cooling and the compressor is malfunctioning, this is a more serious issue.
- Replacement:
- Warning: This is a more complex repair, and it’s often recommended to hire a professional.
- If attempting yourself, unplug the fridge and locate the compressor at the back or bottom.
- Discharge any refrigerant (this must be done by a certified technician as refrigerants are harmful to the environment).
- Remove the old compressor by disconnecting the lines and electrical connections.
- Install the new compressor and recharge the refrigerant.
- Tip: Since this is an expensive part, weigh the cost of replacement vs. buying a new fridge.

Evaporator Fan Motor
- Problem: If the fridge isn’t cooling or the freezer is cold but the fridge is warm, the evaporator fan could be faulty.
- Replacement:
- Unplug the fridge and remove the freezer compartment shelves.
- Locate the evaporator fan behind the back panel in the freezer.
- Disconnect the wiring and remove the old fan motor.
- Install the new motor, reconnect the wires, and replace the panel.
- Plug the fridge back in.
- Tip: Check if the fan blades are turning freely before replacing the motor.

Start Relay
- Problem: If the compressor isn’t running but the fridge has power, the start relay may need replacement.
- Replacement:
- Unplug the fridge and locate the start relay near the compressor.
- Disconnect the relay from the compressor terminals.
- Install the new relay and reattach the wiring.
- Plug the fridge back in and check if the compressor starts.
- Tip: The start relay is usually an inexpensive part, and replacing it can often solve major cooling issues.
8. Light Bulb
- Problem: If the fridge light is out, it might just need a new bulb.
- Replacement:
- Unplug the fridge.
- Locate the light cover (usually in the ceiling or sides of the fridge interior).
- Unscrew the old bulb and replace it with a new one.
- Plug the fridge back in.
- Tip: Use the same wattage and type of bulb as specified in the user manual.
9. Shelves and Drawers
- Problem: Broken or cracked shelves and drawers reduce storage capacity.
- Replacement:
- Find the exact replacement parts based on your fridge model (check the manufacturer’s site or local parts stores).
- Remove the damaged shelves or drawers and slide the new ones into place.
- Tip: Some parts are universal, but model-specific parts ensure a better fit.
Cost of part replacement in Fridge
- The cost of replacing parts in a fridge can vary widely based on the specific part, brand, and whether you hire a professional for the job.
- Below is an estimate for common refrigerator part replacements:
Door Gasket/Seal
- Part Cost: $20 – $80
- Labor Cost: $50 – $125 (if done by a professional)
- DIY: This is a relatively easy repair and can be done by most homeowners.
- Total Cost: $20 – $200 (depending on DIY vs. professional installation)
Water Filter
- Part Cost: $10 – $60 (depending on the brand and type of filter)
- Labor Cost: $0 (most water filters are easily replaceable by homeowners)
- Total Cost: $10 – $60
Condenser Coils
- Part Cost: $100 – $300 (if replacement is needed)
- Labor Cost: $100 – $250 (depending on complexity)
- Total Cost: $200 – $550
- Note: Often, dirty coils just need to be cleaned, which could cost $75 – $150.
Evaporator Fan Motor
- Part Cost: $50 – $150
- Labor Cost: $100 – $300
- Total Cost: $150 – $450
Compressor
- Part Cost: $200 – $500
- Labor Cost: $300 – $500 (installation by a professional is almost always required)
- Total Cost: $500 – $1,000
- Note: Because of the high cost, consider whether it’s worth replacing the compressor or purchasing a new refrigerator.
Start Relay
- Part Cost: $20 – $60
- Labor Cost: $100 – $200
- Total Cost: $120 – $260
Thermostat/Temperature Control
- Part Cost: $40 – $120
- Labor Cost: $100 – $250
- Total Cost: $140 – $370
Defrost Heater
- Part Cost: $25 – $100
- Labor Cost: $100 – $250
- Total Cost: $125 – $350
Condenser Fan Motor
- Part Cost: $60 – $125
- Labor Cost: $100 – $250
- Total Cost: $160 – $375
10. Light Bulbs
- Part Cost: $5 – $20
- Labor Cost: $0 (usually DIY)
- Total Cost: $5 – $20
11. Ice Maker Assembly
- Part Cost: $60 – $300
- Labor Cost: $100 – $250
- Total Cost: $160 – $550
Water Inlet Valve
- Part Cost: $20 – $90
- Labor Cost: $100 – $250
- Total Cost: $120 – $340
. Shelves and Drawers
- Part Cost: $20 – $200 (depending on the part and brand)
- Labor Cost: $0 (can be DIY)
- Total Cost: $20 – $200
Defrost Timer
- Part Cost: $40 – $100
- Labor Cost: $100 – $250
- Total Cost: $140 – $350
Additional Factors to Consider:
- Brand of Fridge: Some brands like Sub-Zero or Viking have higher parts and labor costs compared to standard brands like Whirlpool or LG.
- Age of the Fridge: For older models, parts may be harder to find and more expensive, making replacement more costly.
- DIY vs. Hiring a Technician: Doing the replacement yourself can save significantly on labor costs, but more complex parts like the compressor or evaporator fan motor should be done by professionals.
What are major parts need to replaced in fridge
- Over time, various parts of a refrigerator can wear out and may need replacement to keep it functioning efficiently. Here are the major parts in a fridge that commonly require replacement:
Door Seals (Gaskets)
- Function: Maintain a tight seal to prevent cold air from escaping.
- Signs of Wear: Cold air leakage, moisture buildup around the door, increased energy consumption.
- When to Replace: If the gasket is cracked, torn, or doesn’t form a proper seal.
Compressor
- Function: Compresses refrigerant and circulates it through the cooling system.
- Signs of Wear: The fridge isn’t cooling, strange noises, or the compressor isn’t running.
- When to Replace: If the fridge doesn’t cool at all and the compressor is diagnosed as faulty. This is a costly repair, so consider the age of the fridge before replacing it.
Condenser Coils
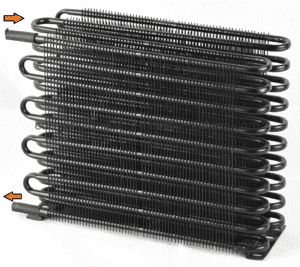
- Function: Release heat from the refrigerant into the surrounding air.
- Signs of Wear: Reduced cooling efficiency, fridge runs continuously, or fridge is too warm.
- When to Replace: Coils are generally durable, but if they become excessively dirty, clogged, or damaged, they may need replacement.
Evaporator Fan Motor
- Function: Circulates cold air from the freezer into the fridge compartment.
- Signs of Wear: Freezer is cold, but the fridge is warm, or strange noises coming from the freezer.
- When to Replace: When the motor stops working or makes grinding noises.
Thermostat
- Function: Regulates the temperature by controlling the compressor.
- Signs of Wear: Inconsistent cooling, fridge too warm or too cold.
- When to Replace: If the thermostat fails to maintain the proper temperature or doesn’t trigger the compressor.
Start Relay
- Function: Helps the compressor start by providing an initial electrical boost.
- Signs of Wear: The compressor fails to start, fridge not cooling, or intermittent operation.
- When to Replace: If the compressor isn’t starting, and the relay is found to be defective.
7. Condenser Fan Motor
- Function: Cools the condenser coils and compressor by circulating air.
- Signs of Wear: The fridge is not cooling properly, fridge runs constantly, or strange noises from the back.
- When to Replace: If the fan motor fails to run, resulting in overheating.
Water Inlet Valve
- Function: Controls the flow of water into the ice maker and water dispenser.
- Signs of Wear: Ice maker doesn’t produce ice, or water dispenser doesn’t work.
- When to Replace: If water isn’t flowing properly or the valve is leaking.
Water Filter
- Function: Filters water for the dispenser and ice maker.
- Signs of Wear: Reduced water flow, poor water taste, or water/ice smells odd.
- When to Replace: Every 6 months or when water flow decreases.
Defrost Heater
- Function: Prevents frost buildup in the freezer by melting ice from the evaporator coils during defrost cycles.
- Signs of Wear: Frost buildup in the freezer, fridge not cooling properly.
- When to Replace: If frost accumulates in the freezer or fridge frequently needs defrosting.
11. Defrost Timer or Control Board
- Function: Cycles the refrigerator in and out of the defrost mode to prevent ice buildup.
- Signs of Wear: Fridge is too warm, freezer frost buildup, or fridge runs constantly.
- When to Replace: If the fridge is stuck in defrost mode or won’t enter it at all.
Ice Maker Assembly
- Function: Automatically makes and dispenses ice.
- Signs of Wear: Ice maker stops working, or ice is irregularly shaped or smaller.
- When to Replace: If the ice maker stops working, produces little or no ice, or the ice maker motor is faulty.
Light Bulb and Light Switch
- Function: Provides interior lighting when the door is opened.
- Signs of Wear: Light doesn’t turn on when the door is opened.
- When to Replace: If the bulb burns out or the light switch is broken.
Shelves and Drawers
- Function: Provide storage space for food.
- Signs of Wear: Cracked or broken shelves or drawers.
- When to Replace: If they are damaged or difficult to clean.
Control Panel/Touchpad
- Function: Allows users to control temperature settings, dispenser options, and more.
- Signs of Wear: Touchpad is unresponsive, fridge settings can’t be adjusted.
- When to Replace: If the control panel fails or malfunctions.

Key Considerations for Replacing Fridge Parts:
Cost-Effectiveness
- Some parts like thermostats, gaskets, or water filters are inexpensive and easy to replace, while parts like the compressor or control boards are more costly. If too many high-cost components need replacement, it may be more economical to purchase a new refrigerator.
High Age of the Refrigerator:
- If your fridge is more than 10-15 years old, it may be better to replace the entire unit rather than repair it, as newer models are more energy-efficient.
Professional Help
- For complex parts like the compressor, evaporator fan motor, or start relay, you may need professional help, as improper installation can lead to further issues or void warranties.
General Tips for Replacing Fridge Parts:
- Know Your Model Number: Always have your fridge’s model and serial number ready when buying replacement parts to ensure compatibility.
- Use OEM Parts: It’s often best to use original equipment manufacturer (OEM) parts for a perfect fit and longer lifespan.
- Check Warranties: Before replacing any major parts, check if your fridge is still under warranty, as some repairs might be covered.
Replacing parts in an old fridge can keep it running efficiently, but it’s important to balance the cost of repairs with the potential need for a new fridge if too many components fail.
